Since the TV show Silicon Valley brutally made fun of image recognition powered by Artificial Intelligence in the infamous hotdog-not-hotdog episode, I decided it was my mission to do something better than that. Who eats hot dogs anyway? I’m French, and at Scality ‘Eat well’ is one of our core values! I wanted an app that automatically sorted melons, delicious summer fruit with low calories, high water content and fiber! I contacted the folks at Machine Box to get their help and used Zenko to do some magic. My mission was to train an algorithm to automatically tag images of melons based on their kind (watermelon, cantaloupe, etc.) and store them in Zenko with metadata for later retrieval. “Not funny!” screamed my colleagues, but I hadn’t meant to be funny.
We manipulate and store lots of data without being able to efficiently search and retrieve them later on. Google Photos and other tools introduced automatic recognition of images to the consumer space but at the cost of losing control of data. The compromise that consumers can accept are often not acceptable for corporations. AI tools like Machine Box can automatically add useful metadata information to the content that is uploaded on your storage. With Zenko, such metadata gets indexed so you can quickly and easily search for the content you’re looking for. I prepared a demo exploring this workflow:
Teach the TagBox application to recognize melon images and differentiate between watermelons, cantaloupes and honeydews
Upload new images to Zenko via the S3 API – the ones we want Machine Box to analyze and tag
Get the TagBox application to check that image directly via S3 and tag it with a melon type with a degree of confidence and some default built-in tags that Machine Box will recognize and return (i.e. “Food”, “Plant”, “Fruit”, etc.)
Upload the Machine Box resulting metadata information to the object in Zenko via S3
Use Zenko Orbit to browse the metadata and search the images for those that have a level of confidence > 0.8 that the image is an image of a watermelon.
It’s a lot easier if you just look at the demo video to understand the different phases of this integration example: upload via S3 API in Zenko, AI teach, AI check, metadata indexing and search.
The multi-cloud character of Zenko lets you use any of the public cloud providers (Amazon, Azure, Google), or on-prem on a NAS or local object storage. With the same S3-based code, switch from an on-prem to an Amazon-based workflow by just choosing the bucket you want to use (associated to an Amazon, Azure, Google, etc. location).
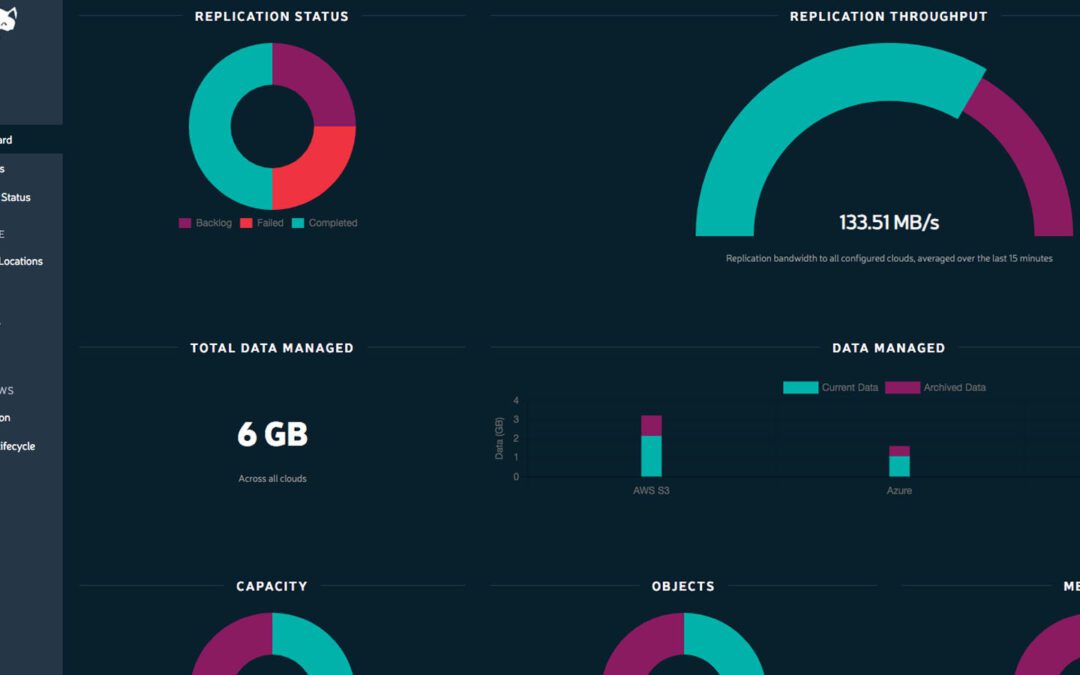
The video below shows two demos of Zenko solving real-life issues faced by developers that need to replicate data across multiple clouds. Developers need to support multiple storage options for their applications and dealing with the complexity of multiple APIs is hard. Even without writing applications with multi-cloud support, the egress costs of transferring large amounts of data across clouds can force choice, reducing options. Zenko is designed to empower developers giving them freedom to choose the best storage solutions for their application while keeping control of where data is stored.
The video below shows two demos with real-life use cases. The first use case is that of a developer who prefers to use Amazon Glacier as archive of choice and wants to use Google Cloud machine learning service. Some of the data needs to be available in Google Cloud for faster processing but Glacier is slow and egress costs can be expensive. Zenko lets easily manage this multiple cloud scenario with a single policy. In addition, it lets developers pick the most cost-effective combination of storage options: without Zenko, if data is stored in AWS but analyzed in Google, you would incur in expensive charges while moving data out of Amazon.
The second demo shows the ability of Zenko to replicate data across three regions in AWS. One known limitation of S3 is that replication is limited to two regions. Replicating data to more than two regions allows to increase data resiliency and security. For example, companies that need a point of presence in Asia, Europe and US West can keep data closer to the point of consumption. Similar challenges for companies that collect data and need to comply with data sovereignty regulations like GDPR. Zenko’s replication augments AWS’s basic capability.
Enjoy the demos and try them out for free on Zenko Orbit.
Maz from our team at Scality has been working on a simple guide explaining how to use Zenko and Orbit to replicate data between Microsoft Azure Blob storage and Amazon S3.
This is a very important milestone for us as it shows how easy it is to just create an account and login into the Zenko management portal, create a Zenko sandbox and start replicating data between 2 completely different public clouds replication wizard, no command line required. – Giorgio Regni
Why is this news worthy?
It is all about data durability and availability!
Replicating your data across different providers is a great way to increase its protection and guarantee that your data will always be available, even in the case of a catastrophic failure:
In terms of durability, we now have two independent services each of which has a durability of eleven 9’s. By storing data across both clouds, we can increase our data durability to “22 9’s” that makes a data loss event a statistically negligible probability.
We can also take advantage of immutability through object versioning in one or more of the cloud services, for even greater protection. We have also gained disaster recovery (D/R) protection, meaning the data is protected in the event of a total site disaster or loss.
In terms of data availability, what are the chances that two cloud regions in one service (for example, AWS US East and AWS US West) are unavailable at the same time? Stretching this further, what are the chances that two INDEPENDENT cloud services such as AWS S3 and Azure Blob Storage are unavailable at the same time?
s3fs is an open source tool that allows you to mount an S3 bucket on a filesystem-like backend. It is available both on Debian and RedHat distributions. For this tutorial, we used an Ubuntu 14.04 host to deploy and use s3fs over Scality’s S3 Server.
Deploying S3 Server with SSL
First, you need to deploy S3 Server. This can be done very easily via our DockerHub page (you want to run it with a file backend).
$> git clone https://github.com/s3fs-fuse/s3fs-fuse.git
$> cd s3fs-fuse
$> ./autogen.sh
$> ./configure
$> make
$> sudo make install
Check that s3fs is properly installed by checking its version. it should answer as below:
 $> s3fs --version

Amazon Simple Storage Service File System V1.80(commit:d40da2c) with OpenSSL
Configuring s3fs
s3fs expects you to provide it with a password file. Our file is /etc/passwd-s3fs. The structure for this file is ACCESSKEYID:SECRETKEYID, so, for S3Server, you can run:
If you’re curious, the structure of this command is s3fs BUCKET_NAME PATH/TO/MOUNTPOINT -o OPTIONS, and the options are mandatory and serve the following purposes:
passwd_file: specifiy path to password file;
url: specify the hostname used by your SSL provider;
use_path_request_style: force path style (by default, s3fs uses subdomains (DNS style)).
From now on, you can either add files to your mountpoint, or add objects to your bucket, and they’ll show in the other.
For example, let’s’ create two files, and then a directory with a file in our mountpoint:
Bitmovin provides a dedicated service, enabling live and on demand encoding of videos into adaptive bitrate formats such as MPEG-DASH and HLS in the cloud. This service comes with a comprehensive API that allows seamless integration into any video workflow.
Recently Bitmovin released a managed on-premises encoding solution on top of Kubernetes and Docker that works for VoD and Live and offers the same features as their cloud encoding service. Managed on-premises encoding offers the benefits of Software as a Service solution while utilizing your own infrastructure.
With the release of their managed on-premises encoding, they also released support for the Scality RING storage, allowing this storage solution to be used in the private cloud. In the following tutorial we will describe how to setup a Scality S3 Server [1] and use it together with the Bitmovin API to download input assets from, and upload the encoded content to.
Setup a Scality S3 Server Storage
In this tutorial we are using the official Scality S3 Server Docker image [2] that allows for a very easy and fast setup. You will need to have Docker installed in order to follow the below steps. We will be using a persistent storage, in order to keep the files we copy to the Scality S3 Server.
With the following command you can start the Scality s3 Server:
This will launch the Scality S3 Server and bind the service to port 80 on your instance. The two environment variables ACCESS_KEY and SECRET_KEY allow you to setup authentication credentials to access the Scality S3 Server.
If you plan to access the service using a DNS name (e.g., scality.bitmovin.com), you must set the environment variable HOST_NAME accordingly. The service will deny requests if the request headers do not match with this value. Alternatively, you can also use an IP without the need to set any hostname. The volume mounts are used to persistently save the data of the Scality S3 Server to directories in your filesystem.
For more information and configuration options refer to the Docker manual [3] at the Scality GitHub project.
With that we have a running Scality S3 Server up and running. To test it with the Bitmovin API we need to create a bucket and upload a test asset into the bucket. For doing that we can use the generic s3cmd command line tool from AWS.
To access your Scality S3 Server with s3cmd a configuration file is required. The following will show an example of a configuration file that will allow access to the just created Scality S3 Server:
Save the configuration file e.g., as scality.cfg so you can directly use it in your s3cmd command or at ~/.s3cfg in which case you do not need to explicitly specify a configuration file.
Create a bucket with s3cmd:
s3cmd -c scality.cfg mb s3://testbucket
Verify the bucket got created:
s3cmd -c scality.cfg ls
Upload a test asset to the bucket:
s3cmd -c scality.cfg put samplevideo.mp4 s3://testbucket/inputs/
Check if the test asset got correctly uploaded:
s3cmd -c scality.cfg ls s3://testbucket/inputs/
Using Scality with the Bitmovin API
Bitmovin added support for the Scality S3 Server with a generic S3 interface. In the following we will discuss an easy example on how to use a Scality S3 Server for retrieving an input asset, as well as for storing the encoded output back to the Scality S3 server. For the sake of simplicity we will be using the same Scality S3 Server for input and output that we have just created above.
Obviously, you could also use different Scality S3 Servers for input and output.
For this tutorial we will be using Bitmovins PHP API client that already has a neat example [4] of how to use a Scality S3 Server for retrieving an input asset and uploading the encoded data back to the Scality S3 Server.
To get the Bitmovin PHP API Client you can either download it from GitHub [5] or install it using composer. Please see the API clients repository for more information about the setup.
First of all we need to specify all data that is required to run the example. In the following we will be using the data from the above Scality S3 Server that we have just created referencing the uploaded input file samplevideo.mp4. We are also specifying an output folder where the encoded files should be placed:
$client = new BitmovinClient('INSERT YOUR API KEY HERE');
For initializing the BitmovinClient you need to have an account with Bitmovin and the API key of your account available.
Create an input configuration
We will create an input referencing the samplevideo.mp4 from our Scality S3 Server.
$input = new GenericS3Input($scalityBucketName, $scalityAccessKey, $scalitySecretKey, $scalityHost, $scalityPort, $scalityInputPath);
Create an output configuration
We will create an output configuration that will allow us to store the encoded files to our Scality S3 Server in the output/samplevideo folder.
$output = new GenericS3Output($scalityAccessKey, $scalitySecretKey, $scalityHost, $scalityPort, $scalityBucketName, $scalityOutputPrefix);
Create an encoding profile configuration
An encoding profile configuration contains all the encoding related configurations for video/audio renditions, as well as the encoding environment itself. Choose the region and cloud provider where the encoding should take place. Of course it is optimal if it is close to where your Scality S3 Server is located to reduce the download and upload times 😉 If you are using Bitmovins on-premises feature, you can simply choose your connected Kubernetes cluster instead of a cloud region and the encoding will be scheduled on your own hardware.
Add video stream configurations to the encoding profile
In the following you will see a configuration for a 1080p H.264 video representation. You will want to add more video representations for your ABR streams as also shown in the example in our GitHub repository.
The JobConfig acts as a container for all the previously created configurations. Here we also define that we want to have MPEG-DASH and HLS output created. The JobConfig object will be passed to the BitmovinClient, that will then start the encoding job and wait until it is finished.
$jobConfig = new JobConfig();
$jobConfig->output = $output;
$jobConfig->encodingProfile = $encodingProfile;
$jobConfig->outputFormat[] = new DashOutputFormat();
$jobConfig->outputFormat[] = new HlsOutputFormat();
$client->runJobAndWaitForCompletion($jobConfig);
After the encoding job has finished you should have all encoded files for MPEG-DASH and HLS with the manifests on your Scality S3 Server. When using Scality you can simply access the files with HTTP. For the above example the HTTP links would be as follows:
First, you need to deploy CloudServer (formerly called S3 Server). This can be done very easily via our DockerHub page (you want to run it with a file backend).
Second, you want to install Duplicity. You have to download this tarball, decompress it, and then checkout the README inside, which will give you a list of dependencies to install. If you’re using Ubuntu 14.04, this is your lucky day: here is a lazy step by step install.
$> tar zxvf duplicity-0.7.11.tar.gz
$> cd duplicity-0.7.11
$> python setup.py install
Using
Testing your installation
First, we’re just going to quickly check that S3 Server is actually running. To do so, simply run $> docker ps . You should see one container named zenko/cloudserver. If that is not the case, try $> docker start cloudserver, and check again.
Secondly, as you probably know, Duplicity uses a module called Boto to send requests to S3. Boto requires a configuration file located in /etc/boto.cfg to have your credentials and preferences. Here is a minimalistic config that you can finetune following these instructions.
[Credentials]
aws_access_key_id = accessKey1
aws_secret_access_key = verySecretKey1

[Boto]
# If using SSL, set to True
is_secure = False
# If using SSL, unmute and provide absolute path to local CA certificate
# ca_certificates_file = /absolute/path/to/ca.crt
Note: If you want to set up SSL with S3 Server, check out our tutorial
At this point, we’ve met all the requirements to start running S3 Server as a backend to Duplicity. So we should be able to back up a local folder/file to local S3. Let’s try with the duplicity decompressed folder:
Note: Duplicity will prompt you for a symmetric encryption passphrase. Save it somewhere as you will need it to recover your data. Alternatively, you can also add the --no-encryption flag and the data will be stored plain.
If this command is succesful, you will get an output looking like this:
Congratulations! You can now backup to your local S3 through duplicity 🙂
Automating backups
Now you probably want to back up your files periodically. The easiest way to do this is to write a bash script and add it to your crontab. Here is my suggestion for such a file:
#!/bin/bash

# Export your passphrase so you don't have to type anything
export PASSPHRASE="mypassphrase"

# If you want to use a GPG Key, put it here and unmute the line below
#GPG_KEY=

# Define your backup bucket, with localhost specified
DEST="s3://127.0.0.1:8000/testbuckets3server/"

# Define the absolute path to the folder you want to backup
SOURCE=/root/testfolder

# Set to "full" for full backups, and "incremental" for incremental backups
# Warning: you have to perform one full backup befor you can perform
# incremental ones on top of it
FULL=incremental

# How long to keep backups for; if you don't want to delete old backups, keep
# empty; otherwise, syntax is "1Y" for one year, "1M" for one month, "1D" for
# one day
OLDER_THAN="1Y"

# is_running checks whether duplicity is currently completing a task
is_running=$(ps -ef | grep duplicity  | grep python | wc -l)

# If duplicity is already completing a task, this will simply not run
if [ $is_running -eq 0 ]; then
    echo "Backup for ${SOURCE} started"

    # If you want to delete backups older than a certain time, we do it here
    if [ "$OLDER_THAN" != "" ]; then
        echo "Removing backups older than ${OLDER_THAN}"
        duplicity remove-older-than ${OLDER_THAN} ${DEST}
    fi

    # This is where the actual backup takes place
    echo "Backing up ${SOURCE}..."
    duplicity ${FULL} \
        ${SOURCE} ${DEST}
        # If you're using GPG, paste this in the command above
        # --encrypt-key=${GPG_KEY} --sign-key=${GPG_KEY} \
        # If you want to exclude a subfolder/file, put it below and paste this
        # in the command above
        # --exclude=/${SOURCE}/path_to_exclude \

    echo "Backup for ${SOURCE} complete"
    echo "------------------------------------"
fi
# Forget the passphrase...
unset PASSPHRASE
So let’s say you put this file in /usr/local/sbin/backup.sh. Next you want to run crontab -e and paste your configuration in the file that opens. If you’re unfamiliar with Cron, here is a good How To.
The folder I’m backing up is a folder I modify permanently during my workday, so I want incremental backups every 5mn from 8AM to 9PM monday to friday. Here is the line I will paste in my crontab:
*/5 8-20 * * 1-5 /usr/local/sbin/backup.sh
Now I can try and add / remove files from the folder I’m backing up, and I will see incremental backups in my bucket.